Orange Jelly: 10 Creative Recipes You Need To Try Today
Ever thought a simple citrus spread could change your cooking? This bright, sweet condiment adds sunshine to breakfast and dinner parties. You’re about to find ten incredible ways to use it in your kitchen.
This guide takes you on a culinary journey. You’ll see orange jelly recipes from classic preserves to savory dishes. There are breakfast treats, glazed meats, decadent desserts, and even a warming cocktail. Each recipe is approachable yet impressive, great for weeknights and special occasions.
Whether you’re new to cooking or have years of experience, these ideas will expand your skills. You’ll learn essential techniques and professional tips. The bright, citrusy flavor works beautifully in ways you might never have imagined.
Get ready for a vibrant, delicious adventure with this simple preserve. Your taste buds are in for a treat!
Key Takeaways
- Discover ten versatile orange jelly recipes ranging from breakfast dishes to elegant desserts
- Learn how to make homemade orange jelly with professional techniques and expert tips
- Explore both sweet and savory applications for this bright citrus spread
- Find recipes suitable for everyday meals and special occasion entertaining
- Master approachable techniques that work for beginners and experienced cooks alike
- Transform simple ingredients into impressive dishes with creative flavor combinations
What Makes Orange Jelly So Versatile in Cooking
Orange jelly is a must-have in the kitchen. It goes from breakfast treats to fancy dinner dishes. Its mix of sweetness, citrus, and smoothness makes simple recipes special.
The secret is its pectin. Pectin makes it gel-like when cold but melts when hot. This makes cooking with orange jelly easy and reliable.
Orange jelly makes both sweet and savory dishes better. Its sweetness balances flavors. It brings together ingredients that might not work well together.
Orange jelly adds depth and tanginess to recipes. It’s great with fatty meats like pork and duck. It also makes desserts fruity without being too sweet.
Knowing how orange jelly works lets you get creative. When heated, its sugars caramelize. This gives meats and pastries a glossy, professional look.
Here’s how orange jelly can improve your cooking:
- Glazing meats: Creates caramelization and a beautiful shiny coating on chicken, pork, and ham
- Baking applications: Adds moisture to cakes and cookies while infusing subtle citrus flavor
- Sauce enhancement: Blends smoothly into marinades and dressings without clumping
- Breakfast spreads: Provides natural sweetness to toast, pancakes, and yogurt parfaits
- Dessert fillings: Serves as a ready-made filling for pastries, donuts, and cookies
Orange jelly is incredibly versatile. It dissolves in hot liquids but keeps its shape as a filling or topping. This makes it a go-to ingredient in many recipes.
It pairs well with rich proteins and desserts. The acidity and sweetness balance out fatty flavors. This is why chefs love it.
Learning about citrus jelly cooking opens up new possibilities. The next ten recipes will show you how to use orange jelly in creative ways. Get ready to explore a world of flavors.
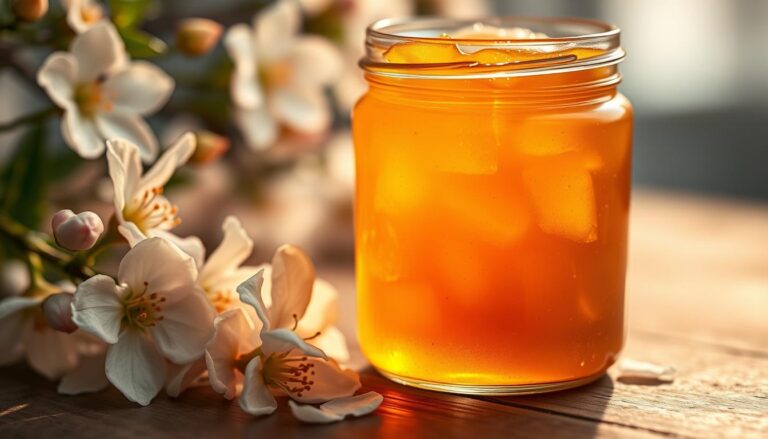
1. Classic Homemade Orange Jelly Recipe
Making your own orange jelly is incredibly satisfying. You only need fresh oranges and a few pantry items. This recipe brings bright, sunny flavors to your breakfast.
This recipe is easy and versatile. It’s great for both beginners and experienced cooks. You can adjust the sweetness and use gelatin or agar agar, depending on your diet.
Gathering Your Ingredients
To start, gather all your ingredients. You’ll need fresh oranges for the best flavor. About 3 medium oranges will give you 1.5 cups of juice.
Choose your setting agent wisely. You can use gelatin for a softer jelly or agar agar for a firmer texture. Both options are delicious and authentic.

Cooking and Setting Process
Now, let’s make the jelly. First, juice your oranges and strain the juice to remove pulp and seeds.
For gelatin, mix ¼ cup of cold water with gelatin. Let it sit for 5 minutes to bloom. This step helps the gelatin dissolve without clumps.
Heat the orange juice and sugar in a saucepan. Stir until the sugar dissolves. Keep it warm, not boiling.
Add the bloomed gelatin to the warm juice. Stir until it’s fully dissolved. Add orange essence or coloring if using.
Pour the mixture into molds or a container. Let it cool to room temperature for 20 minutes. Then, refrigerate for 4 hours to set.
Testing for Proper Consistency
Checking the jelly’s consistency is key. Use the plate test or spoon test to see if it’s ready.
The plate test involves freezing a plate and testing the jelly. If it wrinkles, it’s set.
The spoon test is quicker. Lift the jelly with a spoon. If it falls in thick drops, it’s set.
Your jelly should be firm but jiggly. It should hold its shape but still wobble. If it’s too soft, chill it for another 1-2 hours.
Storage Tips for Maximum Freshness
Proper storage keeps your jelly fresh for weeks. Use clean, airtight containers like glass jars. They prevent odors and stains.
Keep your jelly in the fridge at 40°F or below. It stays fresh for 2-3 weeks. Always use clean utensils to scoop out jelly.
To freeze, divide the jelly into small containers. Leave ½ inch of space for expansion. Frozen jelly lasts up to 3 months. Thaw it in the fridge before using.
Label your containers with the date. Discard any jelly with off odors, color changes, or mold. With care, you’ll always have delicious homemade jelly.
2. Orange Jelly Glazed Donuts
Turn simple breakfast treats into something special with these homemade donuts. They have a delicious orange jelly glaze. These orange jelly donuts mix the comfort of fresh dough with the bright taste of citrus. They’re perfect for a weekend brunch or to make your mornings better.
The orange glazed donuts are all about balance. They have a crispy outside, a fluffy inside, and a shiny glaze. Plus, you can make them fresh, so they’re always up to your standards.

Preparing Your Donut Dough
To make your homemade donuts with orange jelly, start by activating the yeast. Mix 2¼ teaspoons of active dry yeast with ¼ cup of warm water (110°F) and a bit of sugar. Wait 5 minutes for it to get foamy, showing the yeast is alive.
In a big bowl, mix 3½ cups of flour, ⅓ cup of sugar, 1 teaspoon of salt, and ½ teaspoon of nutmeg. Add the yeast mixture, ¾ cup of warm milk, 2 beaten eggs, and ¼ cup of melted butter. Mix until it forms a soft dough.
Knead the dough for 8 minutes until it’s smooth and elastic. Place it in a greased bowl, cover it, and let it rise in a warm spot for 1 hour. It should double in size.
Roll the dough to ½-inch thickness. Use a donut cutter or two round cutters to cut your donuts. Place them on parchment paper squares and let them rise for another 30 minutes.
Frying to Golden Perfection
When frying donuts, temperature is key. Heat vegetable oil in a deep pot to 350°F. Use a candy thermometer to keep the oil at the right temperature. Too hot or too cold can ruin the donuts.
Fry 2-3 donuts at a time in the hot oil. They’ll float off the paper quickly. Fry each side for about 90 seconds until they’re golden brown. Flip them only once for the best texture.
Take the donuts out with a slotted spoon and place them on a wire rack. This lets excess oil drip off. Let them cool for 5 minutes before glazing.
Making the Orange Jelly Glaze
Your orange jelly glaze recipe is easy. In a saucepan, mix ½ cup of orange jelly with 2 tablespoons of water. Heat it over low heat, stirring constantly, until it’s smooth.
Remove from heat and whisk in 2 cups of powdered sugar, orange zest, and orange juice. The glaze should be thick enough to coat the back of a spoon. If it’s too thick, add water. If it’s too thin, add more powdered sugar.
For extra flavor, add a drop of vanilla extract or a pinch of cinnamon. The glaze should be warm but not hot when you apply it.
Glazing Technique for Even Coverage
For a perfect glaze, hold each donut by its hole and dip the top half into the warm glaze. Twist it as you pull it out to catch drips.
Immediately place the glazed donut back on the wire rack and let it sit for 2-3 minutes. The glaze will set into a beautiful, glossy finish. For double-glazed donuts, wait 10 minutes and repeat the dipping process.
Another way is to drizzle the glaze over the donuts with a spoon. This gives them an artisanal look. Work quickly while the glaze is still fluid.
Serve your orange glazed donuts within 4-6 hours for the best taste. Enjoy them warm with coffee or tea, letting the citrus flavor shine.
3. Orange Jelly Thumbprint Cookies
Butter cookies with jelly in the center are a perfect mix of simple and fancy. They’ve been a favorite at holidays and tea parties for years. Adding orange jelly gives them a fresh, citrusy taste. They’re easy to make and look great on any dessert table.
These cookies are great for many occasions. They’re perfect for cookie exchanges, snacks, or special events. The mix of buttery and tangy orange is loved by both kids and adults.

Mixing the Buttery Cookie Base
To make perfect orange jelly cookies, start with quality ingredients. Take your butter out of the fridge an hour before baking. It should be soft but not melted or greasy.
Cream together one cup of room-temperature butter and two-thirds cup of sugar with an electric mixer. Beat for three minutes until it’s light and fluffy. This adds air for a tender texture.
Add one egg yolk and two teaspoons of vanilla extract to the butter mixture. Beat until it’s smooth. Then, mix in two cups of flour and a quarter teaspoon of salt slowly. Stop when the dough just comes together.
The dough should be soft but not sticky. If it’s too wet, add flour a tablespoon at a time. If it’s too dry, a teaspoon of milk can fix it.
Shaping and Creating the Wells
Roll the dough into balls about one inch in diameter. A small cookie scoop helps make them all the same size. This ensures they bake evenly.
Place the dough balls on a parchment-lined baking sheet, leaving two inches between each. Press a well into the center of each ball with your thumb. Make it deep enough for jelly without going through.
Pro tip: dip your thumb in flour or sugar before pressing to prevent sticking. You can also use the back of a rounded half-teaspoon measure for more control.
The wells should be half an inch deep and wide enough for a dollop of jelly. It’s okay if the edges crack a bit—it adds to their charm.
Filling and Baking Instructions
You can fill your orange jelly thumbprints before or after baking. Filling before baking makes the jelly caramelized at the edges. Filling after baking keeps the jelly bright and fresh.
For pre-bake filling, spoon half a teaspoon of orange jelly into each well before baking. The jelly will bubble and spread slightly, creating beautiful centers.
Preheat your oven to 350°F (175°C). Bake the cookies for 12 to 15 minutes until the edges are light golden. The centers should still look pale—they’ll cook a bit more after you take them out.
If you fill after baking, bake the cookies first. While they’re still warm, gently press the centers if they’ve puffed up. Then fill each well with orange jelly once they’ve cooled for about five minutes.
Let the cookies cool completely on the baking sheet for ten minutes before transferring them to a wire rack. This allows the jelly to set and prevents the cookies from breaking. Store them in an airtight container at room temperature for up to five days, or freeze for up to three months.
4. Orange Jelly Breakfast Parfait
Start your day with a delicious orange jelly breakfast. It combines creamy yogurt, crunchy granola, and sweet citrus. This nutritious morning meal is quick to make but looks fancy.
You can make it your own by choosing your favorite ingredients. It’s perfect for meal prep or a special weekend treat. This recipe always turns out great.
Selecting the Perfect Foundation
Choosing the right yogurt is key for a great parfait. Greek yogurt has lots of protein to keep you full. It’s also creamy, which holds up well against the jelly.
Regular yogurt is lighter and sweeter. It’s great if you like a milder taste. Coconut yogurt is creamy and works well with citrus flavors.

Granola is important too. You can buy it or make your own. Choose whole grain oats and minimal sugar for a healthier option.
Homemade granola lets you pick every ingredient. Mix oats, nuts, seeds, honey, and spices. Bake until it’s golden and fragrant.
| Yogurt Type | Protein Content | Texture Profile | Best For |
|---|---|---|---|
| Greek Yogurt | 15-20g per cup | Thick and creamy | High-protein breakfast, athletic lifestyles |
| Regular Yogurt | 8-12g per cup | Smooth and pourable | Lighter meals, children’s preferences |
| Coconut Yogurt | 1-3g per cup | Rich and silky | Dairy-free diets, tropical flavor combinations |
| Icelandic Skyr | 17-20g per cup | Ultra-thick | Maximum satiety, traditional preparations |
Building Instagram-Worthy Layers
Make your parfait look good by choosing the right glass. Clear glasses show off your layers. Use mason jars, tall glasses, or wine glasses.
Start with yogurt, then add granola, and then jelly. Keep adding layers until your glass is full. Make sure each layer is separate.
To keep granola crunchy, don’t mix it with wet ingredients until you eat it. If you’re meal prepping, store granola in small containers. Add it just before eating.
End with a yogurt layer and a dollop of jelly on top. This makes your parfait look fancy. You can also drizzle extra jelly for extra flair.
Enhancing with Fresh Seasonal Produce
Adding fresh fruits makes your parfait amazing. Summer fruits like berries are perfect with orange jelly. They add color and nutrients.
In winter, use more orange flavors. Add orange segments for a pop of color and taste. They match the jelly’s citrus flavor.
Tropical fruits are available all year. Try mango, pineapple, or kiwi for a unique twist. They match the jelly’s sweetness.
Choose fruits that match your parfait’s colors. Purple berries, green kiwi, or yellow mango add contrast. They make your parfait look great.
Make parfaits on Sunday for the week. Store them in the fridge for up to four days. Keep granola separate. This saves time and ensures you eat well every morning.
5. Orange Jelly Glazed Chicken Thighs
Orange jelly is not just for breakfast toast. It makes an amazing glaze for chicken thighs. This savory orange jelly recipe shows how your favorite preserve can be part of dinner. The jelly’s sweetness pairs well with savory flavors, creating a sticky, caramelized coating.
This orange jelly chicken dish has the perfect mix of flavors. The citrus sweetness complements the juicy meat, making it look glossy. Once you try it, you’ll want to make it often.
Creating Your Sweet and Savory Blend
Your orange jelly marinade is easy to make. Mix half a cup of orange jelly with three tablespoons of soy sauce for umami. Add two cloves of minced garlic and one tablespoon of grated ginger for depth.
Include a quarter teaspoon of red pepper flakes for a hint of heat. This small amount adds complexity without overpowering. Whisk until the jelly dissolves, making the marinade smooth.
The natural sugars in orange jelly make a thicker, stickier glaze. This means better flavor coverage on your chicken. Every bite is intense.

Optimal Soaking Duration and Conditions
Let your chicken soak in the flavors for a good amount of time. Place six to eight chicken thighs in a bag or container. Pour the orange jelly marinade over them, making sure they’re evenly coated.
Refrigerate for at least two hours, but overnight is best. Cold temperatures keep the chicken safe and tenderize it. Never marinate at room temperature to avoid food safety risks.
Even 30 minutes of marinating adds flavor. But longer times let the garlic and ginger penetrate deeper. Overnight marination makes a big taste difference.
Achieving Golden, Sticky Perfection
Preheat your oven to 400°F for the best results. Remove the chicken from the marinade and place it skin-side up on a baking sheet. Save the marinade for basting later.
Bake the orange glazed chicken thighs for 35 to 45 minutes. After 20 minutes, start basting every 10 minutes. This builds sticky layers.
The basting caramelizes the sugars gradually. The glaze will darken from orange to amber. The chicken is done when it reaches 165°F in the thickest part.
Broil for the last five minutes for extra caramelization. Watch closely to avoid burning. The result is glossy, deeply colored chicken with crispy edges.
| Cooking Stage | Temperature | Time Duration | Action Required |
|---|---|---|---|
| Initial Baking | 400°F | 20 minutes | No basting needed |
| Basting Phase | 400°F | 15-25 minutes | Baste every 10 minutes |
| Caramelization | Broil (500°F) | 3-5 minutes | Watch constantly |
| Resting | Room temperature | 5 minutes | Cover loosely with foil |
Pairing Ideas That Complement
Your orange jelly chicken needs sides that match its flavors. Steamed jasmine rice is a great choice. It soaks up the glaze and doesn’t compete with the chicken.
Roasted vegetables add a nice contrast. Try Brussels sprouts, carrots, or broccoli. Their char balances the sweetness of the glaze.
Asian-inspired slaws add a refreshing crunch. Mix shredded cabbage, carrots, and cilantro with rice vinegar dressing. This cool element cuts through the richness of the chicken.
Here are more pairing ideas:
- Coconut rice with toasted almonds for tropical flair
- Sautéed bok choy or snow peas for quick green vegetables
- Quinoa pilaf with dried cranberries for added texture
- Cucumber salad with sesame seeds for cooling contrast
- Garlic green beans for a simple, classic side
Garnish with green onions and sesame seeds for a fancy look. Add a fresh orange wedge for a citrusy touch. This orange glazed chicken thighs recipe turns dinner into a special occasion.
6. Orange Jelly Swirl Cheesecake
Make your dessert table shine with an elegant orange swirl cheesecake. It has beautiful marbled patterns and tangy citrus notes. This citrus cheesecake recipe mixes the creaminess of traditional cheesecake with vibrant orange jelly ribbons. Your guests will think it’s from an upscale bakery!
Success comes from proper preparation and patience. Each part works together to make a dessert that looks great and tastes amazing.
Creating the Graham Cracker Crust
Begin with a sturdy base for your orange jelly cheesecake. Crush 2 cups of graham crackers until they’re fine. You can use a food processor or a rolling pin in a sealed bag.
Mix the crumbs with 6 tablespoons of melted butter and 3 tablespoons of sugar. It should look like wet sand. Press it into a 9-inch springform pan with a measuring cup for an even layer.
Pre-bake the crust at 350°F for 10 minutes. This step prevents sogginess and gives crisp edges.
Mixing the Cream Cheese Filling
For a smooth filling, use room temperature ingredients. Let 32 ounces of cream cheese sit out for at least an hour. Cold cream cheese makes lumps.
Beat the cream cheese on medium-low speed until it’s smooth. Add 1 cup of sugar slowly, then 4 large eggs one at a time. Finish with 1 tablespoon of vanilla extract and 1/4 cup of sour cream.
Here’s what makes the difference:
- Mix at medium-low speed to avoid excess air
- Scrape bowl sides often for even consistency
- Stop mixing once it’s smooth
- Don’t over-mix to avoid cracks
Adding the Orange Jelly Swirl Effect
This technique turns ordinary cheesecake into art. Warm 1/2 cup of orange jelly in the microwave for 20 seconds. Pour the cheesecake batter into your crust.
Drop spoonfuls of warmed orange jelly on the batter. Use a knife or skewer to swirl the jelly through, creating beautiful marble patterns. Make figure-eight motions and pull the knife in different directions.
The golden rule: don’t over-swirl! Too much mixing makes it look muddy. Aim for 8-10 gentle swirls.
Baking and Cooling Guidelines
A water bath ensures even baking without cracks. Wrap the springform pan with two layers of heavy-duty aluminum foil. Place it in a larger roasting pan with hot water halfway up the sides.
Bake at 325°F for 55-65 minutes. The cheesecake is done when the edges are set but the center jiggles slightly. Turn off the oven and crack the door open for one hour.
Follow this cooling schedule for best results:
- Cool in oven with door ajar for 1 hour
- Remove from water bath and cool at room temperature for 1 hour
- Refrigerate uncovered for 1 hour
- Cover and refrigerate overnight (minimum 8 hours)
This overnight refrigeration melds flavors perfectly and ensures creamy texture. Run a thin knife around the edges before releasing the springform pan. Your bakery-worthy creation is ready to serve and enjoy!
7. Orange Jelly Smoothie Bowl
Smoothie bowls have become a big hit for breakfast. Adding orange jelly gives them a stunning twist. This orange jelly smoothie bowl is creamy and full of bright citrus flavors. It’s a healthy and satisfying breakfast option.
The beauty of an orange smoothie bowl recipe is its flexibility and looks. You can make it fit your diet while keeping it beautiful. It’s perfect for busy mornings or weekend brunches.
Blending Your Frozen Base
To make a smoothie bowl, start with a thick, spoonable mix. Use frozen bananas as the base for creaminess without dairy. Aim for two frozen bananas to one cup of other frozen fruits.
Use minimal liquid in your blender. Start with one-quarter cup of almond milk, coconut water, or orange juice. Adding more liquid can make it too runny.
Choose frozen fruits that go well with orange. Mango and pineapple add sweetness and tanginess. Mixed berries add color. You can also add spinach for extra nutrients without changing the taste.
Blend in short bursts with a high-powered blender. Stop to scrape down the sides with a spatula. This ensures everything blends well. Your mix should be like soft-serve ice cream.
Incorporating Orange Jelly Drizzle
The orange jelly drizzle makes your smoothie bowl special. Start by heating three tablespoons of orange jelly in a microwave-safe bowl for 15 to 20 seconds. It should be warm but not hot.
Stir the jelly until it’s smooth and liquid. If it’s too thick, add a teaspoon of warm water and mix well. You want a glossy drizzle that flows easily.
Pour your smoothie base into a bowl and smooth the top. Create a surface for your drizzle. Use a spoon or squeeze bottle to make patterns like swirls or zigzags.
The orange jelly adds sweetness and a beautiful contrast. It will firm up slightly on the cold smoothie, adding interesting texture.
Topping Combinations That Work
The right smoothie bowl toppings make your breakfast complete. Mix different textures like crunchy, creamy, and chewy. Your toppings should be nutritious and match the orange jelly flavor.
For a tropical-inspired combination, use coconut flakes, mango slices, macadamia nuts, and almond butter. This enhances the orange jelly’s citrus notes. Add chia seeds for omega-3s and extra staying power.
A classic option is granola, strawberries, blueberries, and Greek yogurt. This adds protein, fiber, and antioxidants. The granola adds crunch.
Chocolate lovers can try cacao nibs, banana slices, hemp hearts, and cashew butter. The chocolate and orange mix is timeless. This version is packed with plant-based protein and healthy fats.
For special occasions, add edible flowers like pansies and violas. Fresh mint leaves and pomegranate seeds add color and flavor. They balance the orange jelly’s sweetness perfectly.
8. Orange Jelly Glazed Pork Tenderloin
This orange jelly meat recipe is perfect for impressing dinner guests. It combines tender pork with a glossy citrus glaze. This makes a dish that feels like it’s from a restaurant, right in your kitchen.
The sweetness of orange jelly complements the pork’s mild flavor. The glaze adds a caramelized touch that’s both sweet and tangy.
Getting Your Meat Ready
First, check your pork tenderloin for silver skin. This tough membrane can make the meat chewy. Use a sharp knife to remove it.
Then, dry the tenderloin with paper towels. This step is crucial for browning and seasoning. Moisture prevents a golden crust.
Let the meat sit at room temperature for 30 minutes before cooking. Cold meat cooks unevenly. Season it with salt and black pepper on all sides.
Building Your Citrus Glaze
To make the perfect glaze, balance sweetness with savory. Mix three-quarters cup of orange jelly with two tablespoons of Dijon mustard. The mustard adds depth.
- Two cloves of minced garlic for aromatic depth
- One tablespoon of fresh rosemary or thyme, finely chopped
- Two tablespoons of apple cider vinegar for tangy balance
- A pinch of red pepper flakes for subtle warmth
- Salt and pepper to taste
Heat the mixture over medium heat, stirring constantly. Simmer for 5-7 minutes until it thickens. The glaze should coat the back of a spoon but still flow easily.
Save about one-third of the glaze for serving. Use the rest for basting.
Achieving Perfect Cooking Results
Preheat your oven to 400°F for the best results. Sear the seasoned tenderloin in a skillet with oil over medium-high heat. Sear each side for 2-3 minutes until golden.
Transfer the skillet to your preheated oven, or place the seared tenderloin on a roasting pan. Brush the meat with glaze. Roast for 15-20 minutes, depending on the size.
Use a meat thermometer to check for doneness. Your target internal temperature is 145°F for juicy, slightly pink pork.
Baste the pork with orange jelly glaze every 7-8 minutes. Each layer builds flavor and creates a caramelized exterior.
Finishing Touches for Maximum Tenderness
Once the thermometer reads 145°F, remove the tenderloin from the oven. Transfer it to a cutting board and tent loosely with foil. This resting period is essential for juicy results.
Let the meat rest for at least 10 minutes before slicing. During this time, the juices redistribute. The internal temperature will also rise about 5 degrees.
When ready to slice, use a sharp knife and cut against the grain at a slight angle. Aim for slices about half an inch thick. Cutting against the grain makes each bite more tender.
Arrange your slices on a serving platter and drizzle with reserved glaze. Garnish with fresh orange slices and herb sprigs. This orange jelly pork pairs well with roasted vegetables, mashed potatoes, or wild rice pilaf.
9. Orange Jelly Layer Cake with Buttercream
Make your next celebration special with an orange jelly layer cake. This orange jelly and buttercream cake has fluffy cake, bright citrus jelly, and creamy frosting. It’s a showstopper that everyone will love.
This orange jelly cake is all about balance. Each slice shows off gorgeous layers that taste amazing. It’s perfect for birthdays, anniversaries, or just to impress your guests.
Creating Perfectly Tender Layers
The key to a great orange layer cake recipe is tender cake layers. Make sure your ingredients are at room temperature. Cold butter and eggs can ruin the texture.
Beat your butter and sugar until light and fluffy. This takes about three to five minutes. It adds air to your batter for that tender crumb.
Don’t overmix when adding flour. Overmixing develops gluten, making your cake tough. Mix just until there are no dry flour streaks left.
Your oven temperature is crucial. Use an oven thermometer to ensure accuracy. Bake at the temperature in your recipe, usually 350°F for cake with orange jelly filling.
Check if your cake is done with these methods:
- A toothpick inserted in the center comes out clean or with just a few moist crumbs
- The cake springs back when you gently press the top
- The edges pull slightly away from the pan sides
- The cake has a light golden color on top
For level cake layers, use cake strips. These fabric strips keep the edges from baking faster. If your layers dome, trim them with a serrated knife after cooling.
Building Stable Jelly Layers
Spread orange jelly between your cake layers carefully. Create a buttercream dam around the edges. This keeps your jelly filling in place and your cake stable.
Start with your first cake layer on your serving plate. Pipe a ring of buttercream around the edge. This is your dam.
Spread your orange jelly inside the buttercream border. Use about one-third to one-half cup of jelly per layer. Too much jelly makes your layers slide, while too little won’t give enough flavor.
Let each filled layer set for about ten minutes before adding the next cake layer. This lets the jelly settle and the buttercream dam firm up. Your cake with orange jelly filling will be stable this way.
Finishing Touches That Impress
The frosting and decoration stage is where you get creative. Try a rustic naked cake style to show off the orange jelly layers. Apply a thin layer of buttercream that doesn’t fully cover the cake.
For a polished look, apply a crumb coat first. This thin layer of frosting traps any loose crumbs. Chill your cake for thirty minutes, then apply your final smooth coat of buttercream. Use an offset spatula or bench scraper for clean edges.
Here are some decoration ideas for your orange jelly and buttercream cake:
- Candied orange slices arranged on top for an elegant citrus accent
- Piped buttercream rosettes or swirls around the top border
- Fresh orange zest sprinkled over the frosting for color and aroma
- A drizzle of extra orange jelly cascading down one side
- Edible flowers that complement the orange color scheme
Color schemes work beautifully with this orange jelly cake. Use creamy white buttercream to let the orange jelly shine. Tint your frosting a pale peach or yellow. Ombre effects from white to orange create stunning visual interest.
Your finished cake should be refrigerated if you’re not serving it within a few hours. The buttercream and jelly filling both benefit from staying cool. Remove it from the refrigerator about thirty minutes before serving so the cake layers soften to room temperature and the flavors bloom.
10. Orange Jelly Spiced Hot Toddy
Make your cold-weather drink routine better with an orange jelly hot toddy. It combines warmth and citrus in a unique way. The orange jelly adds sweetness and flavor to this comforting drink.
This cocktail is simple yet flavorful. Unlike traditional recipes, it uses orange jelly for sweetness. It’s perfect for cozy evenings when you need something warm and tasty.
This hot toddy recipe adds a twist to classic ingredients. It’s a drink that soothes your throat and pleases your taste buds. You can adjust the strength and spice to your liking.
Essential Components for Your Cocktail
Before making your orange jelly hot toddy, gather your ingredients. Having everything ready makes the process enjoyable. Quality ingredients make a big difference in taste.
Here’s what you’ll need for this warming drink:
- Orange jelly: 2-3 tablespoons as your sweetener and citrus base
- Hot water: 1 cup at around 180°F (not boiling)
- Spirit of choice: 1.5-2 ounces bourbon, whiskey, or dark rum
- Fresh lemon juice: 1 tablespoon for brightness
- Cinnamon sticks: 1-2 for stirring and infusing
- Whole cloves: 2-3 for warming spice notes
- Star anise: 1 pod for visual appeal and flavor
The quality of your spirits is important in this orange jelly drink. Choose a bourbon or whiskey with smooth notes. Dark rum is great if you prefer a sweeter taste.
Proper Jelly Incorporation Technique
The key to a great orange jelly cocktail is dissolving the jelly right. Heat your water to 180°F to melt the jelly without harsh flavors. Use a kitchen thermometer or wait 30 seconds after boiling.
Pour the hot water into your favorite mug. Add the orange jelly while the water is still hot. Stir continuously for 30-45 seconds until it’s fully dissolved.
When the liquid is clear and golden-orange, it’s ready. This base is the foundation of your hot toddy, ensuring even sweetness.
Final Assembly and Flavor Building
Now, your orange jelly drink comes together. Add your spirit and stir gently. Use 1.5 ounces for a balanced taste.
Squeeze in fresh lemon juice next. It brightens the flavors and adds a refreshing contrast to the sweet orange notes. The acidity balances the jelly’s richness perfectly.
Drop in your spices for the final touch. The cinnamon stick can stir and release flavors as you sip. Cloves and star anise add depth without overpowering the drink.
Let the spices steep for 2-3 minutes before drinking. This lets their flavors infuse into your drink. Adjust the steeping time for your desired spice level.
For a fancy look, garnish with a fresh orange twist or slice. A sprinkle of ground cinnamon on top looks great. Serve it hot and aromatic.
This comforting drink is perfect for cold winter nights or relaxing after dinner. The mix of warmth, citrus, and spice makes it unforgettable.
Conclusion
You’ve seen ten unique ways to make orange jelly into amazing dishes. This summary shows how one ingredient can change breakfast, lunch, dinner, and dessert.
Making orange jelly at home lets you control sweetness and quality. You can make batches for the whole month. Store-bought jelly is great when you’re short on time.
These ideas show orange jelly’s versatility. You can glaze chicken and pork for quick dinners. Or fill cookies and cakes for special events. You can even add it to morning parfaits or evening cocktails.
Start with recipes that fit your skill level. The breakfast parfait is easy for beginners. The layer cake is for more experienced bakers. Each recipe helps you grow more confident with this versatile ingredient.
Try your own twists on these recipes. Use orange jelly instead of apricot or peach preserves. Mix it with herbs for savory glazes. Or combine it with cream cheese for quick appetizer spreads.
Your kitchen now has fresh ideas for using orange jelly. Pick a recipe to try this week. Share your success with friends and family. The bright citrus flavor will brighten any meal.
FAQ
Can I use store-bought orange jelly instead of making it from scratch?
Yes, you can! Store-bought orange jelly is great for these recipes. Look for brands with natural ingredients. It’s perfect when you’re short on time.
Choose a jelly that’s not too sweet. This way, it won’t overpower your dish.
What’s the difference between orange jelly and orange marmalade?
Orange jelly is smooth and clear. It’s made from orange juice without any fruit pieces. Orange marmalade, on the other hand, has bits of orange peel.
For the best results, use smooth orange jelly. It’s perfect for glazes and swirls. But marmalade can work too, if you like a bit of texture.
How long does homemade orange jelly last?
Homemade orange jelly lasts 2-3 weeks in the fridge. You can freeze it for up to 6 months. Just portion it into smaller containers.
If you’re canning it, sealed jars can last a year. Always check for signs of spoilage before using.
Can I make orange jelly without gelatin for a vegetarian or vegan option?
Yes! Use agar agar as a plant-based alternative. Agar agar is from seaweed and works great for jelly. Use about 1 teaspoon of agar agar powder for every tablespoon of gelatin.
The process is similar. Dissolve the agar agar in orange juice while heating. Then, let it cool and set. It sets at room temperature and has a firmer texture than gelatin.
What meats pair best with orange jelly glazes?
Orange jelly glazes are great with pork, chicken, duck, turkey, and salmon. The sweetness of orange jelly complements fatty meats well. It cuts through richness and caramelizes during cooking.
This creates a beautiful, glossy finish. The sweet and savory flavors elevate simple proteins into restaurant-quality dishes. Try different meats to find your favorite!
Should I fill thumbprint cookies with orange jelly before or after baking?
You can do either, and both work well. Filling before baking creates a more integrated flavor. But the jelly might darken or bubble during baking.
Filling after baking preserves the bright color and fresh flavor. You can fill the wells while the cookies are still warm. Many prefer this method for a jewel-like appearance.
Can I adjust the sweetness level in these orange jelly recipes?
Definitely! You can balance the sweetness in several ways. For savory dishes, add ingredients like soy sauce or apple cider vinegar to cut the sweetness.
In desserts, use less sugar in the surrounding components. This lets the orange jelly shine without being too sweet. Adjust the sugar in homemade orange jelly to your taste.
What can I do if my homemade orange jelly doesn’t set properly?
If your orange jelly is too runny, you have a few options. First, give it more time. Sometimes, jelly needs a full 24 hours in the fridge to set properly.
If it’s still not setting, reheat the mixture and add more gelatin or agar agar. Then, chill again. If it’s too firm, gently warm it and stir in a little orange juice or water.
The plate test and spoon test will help you check the consistency before it sets.
Are there any complementary flavors that work well with orange jelly?
Orange jelly pairs well with many flavors! Try vanilla, almond extract, cinnamon, ginger, and chocolate in sweet dishes. For savory dishes, orange jelly complements garlic, soy sauce, and fresh herbs.
It also works with ginger, red pepper flakes, mustard, and balsamic vinegar. Dairy products like cream cheese and buttercream provide a nice contrast. Don’t be afraid to experiment!
Can I make orange jelly desserts ahead of time for parties?
Most orange jelly desserts are great make-ahead options. The orange jelly swirl cheesecake improves with overnight refrigeration. Thumbprint cookies can be baked several days in advance.
The layer cake can be assembled a day ahead. Breakfast parfaits can be prepared the night before, but add granola just before serving. Orange jelly glazed donuts are best enjoyed fresh but can be made a few hours ahead.
For glazed meats, prepare the marinade in advance. But cook the protein closer to serving time for the best texture and temperature.
What’s the best way to achieve that perfect swirl effect in the cheesecake?
Creating beautiful swirls in your orange jelly cheesecake requires a gentle touch. Slightly warm your orange jelly so it’s pourable. Then, drop spoonfuls of jelly randomly across the surface of your unbaked cheesecake batter.
Using a butter knife, skewer, or toothpick, gently drag through the jelly dollops in various directions. Try figure-eight patterns, straight lines, or curves. Don’t over-swirl, as this can blend everything into a muddy color. Two or three passes through each area is usually perfect for that elegant, artistic effect!
How do I prevent my orange jelly glaze from burning when cooking meat?
Orange jelly contains natural sugars that can burn at high temperatures. To prevent burning, control your cooking method. Use moderate oven temperatures (around 350-375°F) when baking glazed chicken thighs or pork tenderloin.
Apply your glaze during the last 15-20 minutes of cooking. Or brush it on in layers during the final stages rather than at the beginning. If you’re grilling, use indirect heat and apply glaze toward the end of cooking. You can also reserve some glaze to brush on after cooking for extra flavor and shine without risk of burning.